Purpose
This article aims to teach you how to run unit tests from terminal and what is the output of those unit tests.
Knowledge of this issue is the first step to automating unit tests execution process.
Beginning
Let’s assume that you just finished the basic funcionality of your android application. The project consists of code but because you care about quality you have also written unit tests. It is just the beginning of your Android adventure so you are not using any continuous integration tool. You always run all of your unit tests manually in the Android Studio IDE :
Right-button click with mouse on test/java folder -> Run Tests in java
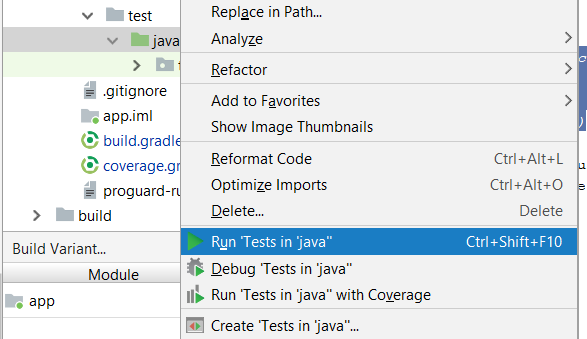
Running all unit tests manually from IDE
You are satisfied because mostly all your tests are passing successfully. Every time you make any changes to your code base, you call them again in same way to check the results. At this stage it is sufficient for your needs.
Motivation
Along with the development of the project, code base becomes bigger and bigger. Instead of one Android developer several people start working on the project with you to meet the business demand for more new features.
You realize that it’s time for automation – tool for calling tests automatically.
The important question arises in your head:
What is needed to call unit test automatically (not with IDE, but by script) and to track results of calling these tests?
I will take you by the hand and guide you to answer this question.
Running unit tests
As you know Gradle build system and Android plugin for Gradle are necessary tools to build your Android application. They also help with unit testing.
Android plugin for Gradle creates specific tasks (for every build variant) that are used to run your unit tests + one general task used to run all build-variant specific tasks.
If your project doesn’t contain any specific flavours it will generate the following tasks:
testDebugUnitTest |
task will run all unit tests with debug build type |
testReleaseUnitTest |
task will run all unit tests with release build type |
test |
task will run all specific test gradle tasks (in this case testDebugUnitTest and testReleaseUnitTest) |
You can always find these tasks with your gradle tasks tree inside tasks group named verification
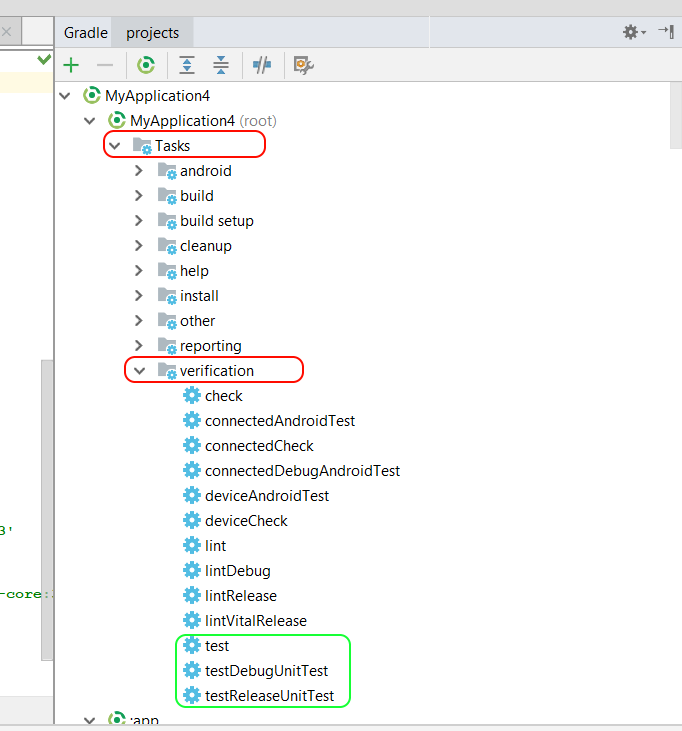
Android Studio – Gradle – Tasks Tree – verification group
If your project contains two flavours (of same dimension) like pro and free it will generate:
testFreeDebugUnitTest |
task will run all unit tests for flavour free with debug build type |
testFreeReleaseUnitTest |
task will run all unit tests for flavour free with release build type |
testProDebugUnitTest |
task will run all unit tests for flavour pro with debug build type |
testProReleaseUnitTest |
task will run all unit tests for flavour pro with release build type |
test |
task will run all specific test gradle tasks (all above) |
You can also read more about those task generation on developer.android site.
Now we know that there are generated tasks, we can simply call specific task from gradle terminal:
gradlew testDebugUnitTest
Calling this test task will:
- ensure that the application of specific build type and flavour will be built
- run all unit tests on this build
- generate test reports in two formats as a result
Result reports of gradle unit test task
The result reports are generated in two formats: XML and HTML:
| Format Type | Purpose | Directory location |
| XML test result | used by different tools | projectPath/moduleName/build/test-results/testDebugUnitTest |
| HTML test result | readable for humans | projectPath/moduleName/build/reports/tests/testDebugUnitTest |
HTML test result
Test result in HTML format is for you. Intended to find out and browse what went well and which test failed. It is easily human readable but paradoxically you will probably not see this report often because XML format with more advanced tools will have more value for you.
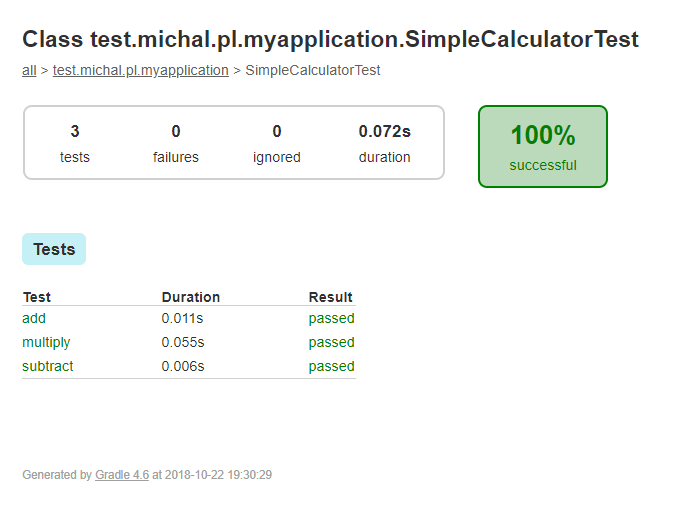
HTML unit tests result
XML test result
The result in this format indirectly will be more useful to you.
Result in XML format is set of XML files. Each file represents one test suite and describes test cases with result of execution.
|
1 2 3 4 5 6 7 8 9 10 11 12 13 14 15 16 17 18 19 20 21 22 23 |
<?xml version="1.0" encoding="UTF-8"?> <testsuite name="com.propaneapps.SimpleCalculatorTest" tests="3" skipped="0" failures="0" errors="0" timestamp="2018-10-22T17:30:29" hostname="DESKTOP-6ESJK06" time="0.072"> <properties/> <testcase name="subtract" classname="com.propaneapps.SimpleCalculatorTest" time="0.006"/> <testcase name="add" classname="com.propaneapps.SimpleCalculatorTest" time="0.011"/> <testcase name="multiply" classname="com.propaneapps.SimpleCalculatorTest" time="0.055"/> <system-out><![CDATA[]]></system-out> <system-err><![CDATA[]]></system-err> </testsuite> |
Don’t be afraid! You will not see these files content too often. Continuous integration tools like Jenkins, Hudson or Travis will use these tests reports in XML format the best way.
When you want to call unit tests e.g. via Jenkins CI and later process the results of those tests reports in XML format will be the main comunication channel.
What’s next?
Now, when you know how to run from terminal your unit tests and what and where the results are you can use this knowledge to make next step:
use one of the CI automation tools to periodically call these tests for you.
I encourage you to wait for the next upcoming “android tests” series articles (now in progress):
- How to call your unit tests from Jenkins CI
I will precisely describe how call your tests on Jenkins CI and analyze results with the help of popular plugin Jenkins JUnit Plugin - Android Code coverage with JaCoCo
What code coverage is? What is its purpose? How to analyze code coverage on Android project with Jacoco gradle plugin?